
The next step in the unsupervised classification process is the selection of an Area of Interest, a.k.a. AOI in Erdas Imagine. The reasons to select an AOI are:
- To reduce the file size (very important when dealing with several images).
- To reduce the range of spatial variability, which is important when we need to apply a technique that considers ranges of variation of the values that characterize an area.
The tutorial presented in this post has been elaborated by the ecologist and agricultural engineer Carola Buitron, with the support of Jose Fernandez. The upcoming posts will show you the remaining steps to accomplish the task I mentioned. Enjoy and learn.

- Open the stacked image: l519971016_stacked; on the tools bar, go to DRAWING →”Insert geometry” →Polygon or Rectangle and delimitate the are of our interest (it does not have to be only one). Then, go to FILE → Save as→ “AOI layer as” and save it with the name, ex., l519971016; then, OK.
- We can close the saved AOI. Later it will be used cut the imagery to be processed.
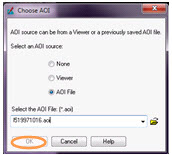
- Go to RASTER →SUBSET AND CHIP→ Create Subset Imagen. It will appear a window in Input File; load the image: l519971016_stacked and in Output File create the folder CUT IMAGES and save the image as l519971016_stacked_cut, then select the option “Ignore Zero in Stats”. Go to AOI and load the created AOI (l519971016). Then, OK.

- Now you will see that the original image has been cut, and now it has the size (spatial extents) of the created AOI.
No comments:
Post a Comment